Last time it was the cables lying to you. You binned the mystery leads, bought the certified ones with the speed and watts printed on the side, labelled the survivors. Good. You fixed the drawer.
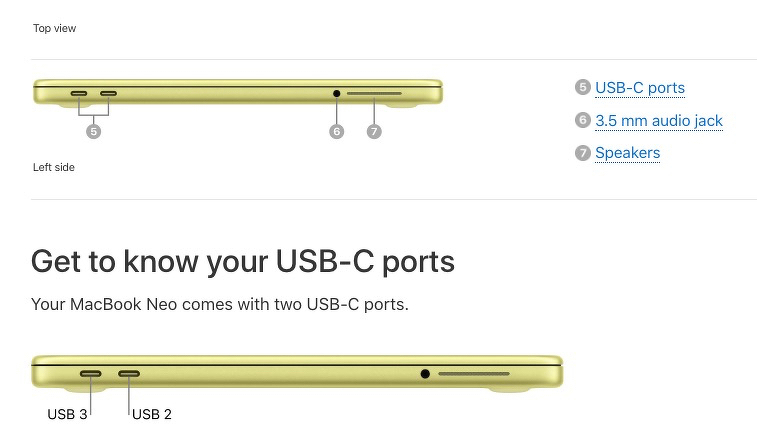
Now look at the laptop itself, because it is about to play the same trick on you. Two ports, same oval socket, same confident silver moulding. One is fast. One is not. And nothing on the outside tells you which is which.
The connector is a shape, not a promise. That was true of the cable. It is just as true of the hole you plug it into.
The MacBook Neo has a slow port and a fast port
Apple’s own support page is unusually blunt about this. The MacBook Neo has two USB-C ports, and they are not equals. Face the left-hand side of the machine: the port furthest to the left is your fast one, USB 3, and it is the one that drives an external display. The port furthest to the right is USB 2 only. Either will charge the laptop, but only one will move data at speed.
Sit with the gap that hides behind those two names. USB 2 tops out at 480 Mbps. USB 3 on this class of machine runs at 5 Gbps, and a real SATA SSD on it will push something like 430 to 520 MB/s. That is roughly ten times the throughput, from the same socket, on the same laptop, decided entirely by which side you reached for.
So you plug your backup drive into the nearest port, the drive mounts, the copy starts, and it crawls. Nothing warns you. macOS does not pop up a dialog saying “you have chosen the slow hole.” It just quietly underperforms, exactly the way the wrong cable did, and you blame the drive.
The fix is free. Use the left port for anything you care about - displays, SSDs, card readers - and leave the right one for the mouse, the keyboard and charging.
On other Macs, look for the lightning bolt
Most Macs are not split this way. The bigger machines run Thunderbolt on every USB-C port, which is the good news. The catch is working out which tier you have, because the tiers are a ladder and the rungs are far apart.
The tell is printed right there on the chassis. A lightning bolt symbol next to the port means Thunderbolt - Intel-certified, video-capable, the high-speed lane. Apple even stamps it above the ports on machines like the 2021 iMac so you know which ones to use for a display. No bolt and you are likely looking at plain USB-C, which on the MacBook and some Mac mini configurations is a real step down.
Where you land on the ladder depends on the year and the chip:
Thunderbolt 3 and 4 both run 40 Gbps. A good external SSD on one of these will sustain somewhere around 2,400 to 2,800 MB/s in the real world. That is the floor for any Apple Silicon MacBook Pro, the M-series Air and most of the desktop line.
Thunderbolt 5 lifts the ceiling to 80 Gbps, and it is on the 2024-and-later 14 and 16-inch MacBook Pro with Pro or Max chips, the 2025 Mac Studio and the M4 Pro Mac mini. Unless you are running multiple 8K streams or an external GPU enclosure, you will struggle to feel the difference over Thunderbolt 4 today. It is headroom you are buying, not everyday speed.
The point is not to memorise the matrix. It is to glance at the port before you commit a big transfer to it. The bolt is the same kind of signal as the speed-and-watts logo on a certified cable. It is the manufacturer telling you, in the one place it cannot easily lie, what this lane can actually do.
The migration trap, and why it can cost you a whole afternoon
Here is where the cable and the port conspire, and where SmartFriend™ Peter Marks earns his trademark again. When you move to a new Mac, Migration Assistant will happily transfer everything across. The question is how, and the difference between the right answer and the wrong one is measured in hours.
Get it wrong and a big migration over Wi-Fi can run two to three hours for 100 GB, and considerably worse if your wireless is busy or the libraries are large. People routinely report sittings that stretch past seven hours. Get it right - a Thunderbolt cable between the two machines, plugged into a Thunderbolt port at both ends - and the same job drops under an hour. One real-world account moved 350 GB in less than 45 minutes that way.
Two things have to line up, and this is the whole lesson. You need the right cable, a genuine Thunderbolt or high-speed USB-C lead rather than the charge-only one that came with something else. And you need the right port at both ends, the one with the bolt, not the USB 2 afterthought. Miss either and you are back on the slow lane, or worse, back on Wi-Fi.
That last bit is the sting. On Apple Silicon, Migration Assistant does not always grab the cable even when one is plugged in. It will sometimes default to Wi-Fi and never tell you it made that choice. So before you walk away, look at the transfer window and check the connection indicator actually says Thunderbolt. If it says anything else, you are about to lose an afternoon to a cable that was sitting there ready the whole time.
The same rule, all the way down
It is the same discipline from the cable post, pushed one layer deeper. The socket will not tell you the truth, the cable might be lying, and now it turns out the port has opinions of its own. The only honest signals are the ones printed where they cannot easily be faked: the speed-and-watts logo on the lead, the lightning bolt on the chassis, the connection indicator in the transfer window.
Read those three and you will never again hand a ten-times-faster job to the slow port out of laziness. Ignore them and the machine will let you, quietly, every single time.
Sources:
- On MacBook Neo, use the right USB-C port for USB 3 vs USB 2 (support.apple.com)
- Identify the ports on your Mac - Thunderbolt 3/4/5 and the lightning bolt symbol (support.apple.com)
- How to use Migration Assistant with a Thunderbolt connection (macworld.com)
- How long does Migration Assistant take, with real examples (mactakeawaydata.com)
- Speed up Migration Assistant using Thunderbolt instead of Ethernet or Wi-Fi (macperformanceguide.com)
- External SSD speeds aren’t what they seem: USB vs Thunderbolt limitations (oretonstorage.com)